Wednesday, April 29, 2015

Train Birthday Party


The little one turned one, and we celebrated DIY style. I think it turned out pretty cute. We did a Train theme, since my mom had found a train cake pan on sale after Christmas before I had even started thinking about the birthday party.

Party Invitation 

 I found this template on VistaPrint. There's a link to the munchkin's Amazon Wish List at the bottom. We dressed him up in conductor clothes and took him to the train climbing structure at a local park to snap the photo.

Dessert Table

The Dessert Table was positioned directly in view of a guest entering the front door.


My mom came a few days before the fĂȘte and helped me set up. She was a big help. For the paper plate background, we used string and tape to connect the plates. Then we hung them up by taping the string the wall. I had also bought sticky tack (I was excited to discover that, yes, they still make it!), but the tape was sufficient. The balloons came from the Dollar Tree. And the little steam signs on the trains I made on the computer by finding a cloud image, printing it with the cake type on it, and cutting it out. I mounted the two kinds of "steam" on flexible straws with tape.

Because some of our party guests are gluten intolerant, and we didn't want little Maple Munchkin eating gluten yet either, the party food was gluten-free, with the exception of some of the cakes.


We had four cakes, all in the shapes of train cars. The cakes were named for the party colors: Red Express (red velvet), Banana Star (gluten-free, sugar-free), Blue Bullet (vanilla, but there was blue frosting to put on it), and Chocolate Choo Choo (not a party color, but hey, it's chocolate cake). The four cakes all radiated from a central "roundhouse wheel" made from an upside down glass lazy susan, some black and white striped ribbon, and a train Christmas ornament.  The roundhouse area was underneath a piece of glass that was held up by candle holders. On top of the glass were some more desserts.


Here's one of the train cakes. You can see the flexible straw more clearly here.

We bundled licorice sticks together and called them "Rail Road Ties."

And we used Rice Krispie Treats as "Cargo Blocks." The large block was cut up into squares, and each square had a cupcake pick. We made two or three of these large blocks to be sure there would be enough to go around.

The frosting was colored to match the party colors and was labeled "Paint" for the train cars. The kids really enjoyed decorating their cars with the frosting and other desserts: Marshmallow "Train Steam" and Raisinet "Rocks and Gravel."


Snack Table

Our party was held after 2nd Baby Nap and before Dinner. So we didn't serve a meal, just snacks and desserts.
This table used a behind-the-sink shelf to hold up a wooden toy train that was actually my mom's gift to the munchkin. The food was served in containers from the Dollar Tree and a ceramic train that my mom found on sale at a craft store after Christmas the previous year.

We had "Choo Choo Wheels" (round peppermints), "Steam" (rice cakes), "Logs" (cheese sticks), "Spikes and Snow" (carrots and ranch dressing), a "Produce Car" (small fruit pieces), and "Landscape Pebbles" (peanuts).

Drinks

We served water in small bottles and juice wrapped in white paper and cute train labels.


Party Decor

This train above the "Baggage Claim" had pictures of the munchkin each month for the first year.

 We used black balloons to make a "train tunnel" out of the hallway.

 "Luggage Check" is code for "leave presents here." :)
 
"Baggage Claim" means "here's our present for you!"


Even the dogs got in on the festivities by wearing $.50 bandanas from the Dollar Tree.

Activities

We printed coloring pages for the children to work on while the guests arrived.


After snacks, we played "Pin the Smokestack on the Locomotive."

And to wind the children down after their cake, my mom read The Little Engine that Could. Here, she's expressing displeasure over the fact that the old tired locomotive would not help the little train. I chose her to read knowing she's a great, expressive storyteller. The kids were rapt.


Reduce Speed! Yard Limit! We're done! Hope you were able to find some inspiration for your party.

Where You Can Get the Things We Used

Note: None of these are affiliate links.

Train Birthday Party Invitation Template: VistaPrint: "Chugga Chugga Choo Choo"
Train Banner Template: Moments That Take My Breath Away Blog
Rectangle Food Label Cards: Moments That Take My Breath Away Blog
Train Whistle Party Favors: Oriental Trading Company
Primary Colors Triangle Flag Banner: Walmart
Train Cake Pan: Etsy
Water Bottle/Juice Labels, Cupcake Picks, and Party Favor Tags: Poofy Cheeks Blog
Pin the Smokestack on the Train game: Birthday in a Box
Gluten-Free Cake: Mommy's Small Business Blog

Of course I created a Pinterest board before throwing a party. :)  All my inspiration is on my Train Birthday Party board.

Make it Better

I'd love to see links to your train birthday parties!

Thursday, August 14, 2014

Replace Cloth Diaper Snaps without Snap Pliers

The finished repair!

A snap broke on one of my Rumparooz diapers - the cute, kangaroo one, too! Pricing snap pliers and a bag of replacement snaps revealed that it'd cost just as much to replace one snap as to buy a new diaper, a fancy one at that. Since I'd gotten this Rumparooz diaper for free from Freecycle, I didn't think it made sense to spend all that cash on replacement parts and gear.

Replace Cloth Diaper Snaps without Snap Pliers

I had a FuzziBunz diaper in my sewing box that I had received as part of a lot on eBay that had delaminated. The seller hadn't realized it and refunded me. So that diaper was free as well, and I kept it around for parts. It came in handy here.


Replace Cloth Diaper Snaps without Snap Pliers
The top right snap on the kangaroo diaper was held on by clear tape so it wouldn't get lost.

Replace Cloth Diaper Snaps without Snap Pliers
I needed the snap from the delaminated FuzziBunz diaper to use on the Rumparooz diaper. So, after some internal convincing (should I use it for a swim diaper? what if I need both parts of the snap one day? can I cut into a cloth diaper? etc.), I took the plunge.

Replace Cloth Diaper Snaps without Snap Pliers
First, I peeled out all the PUL I could. Then I cut away the fleece, thinking I may want to have it for some future purpose, like a liner.

Replace Cloth Diaper Snaps without Snap Pliers
Then I cut off the tab where the snap was.

Replace Cloth Diaper Snaps without Snap Pliers

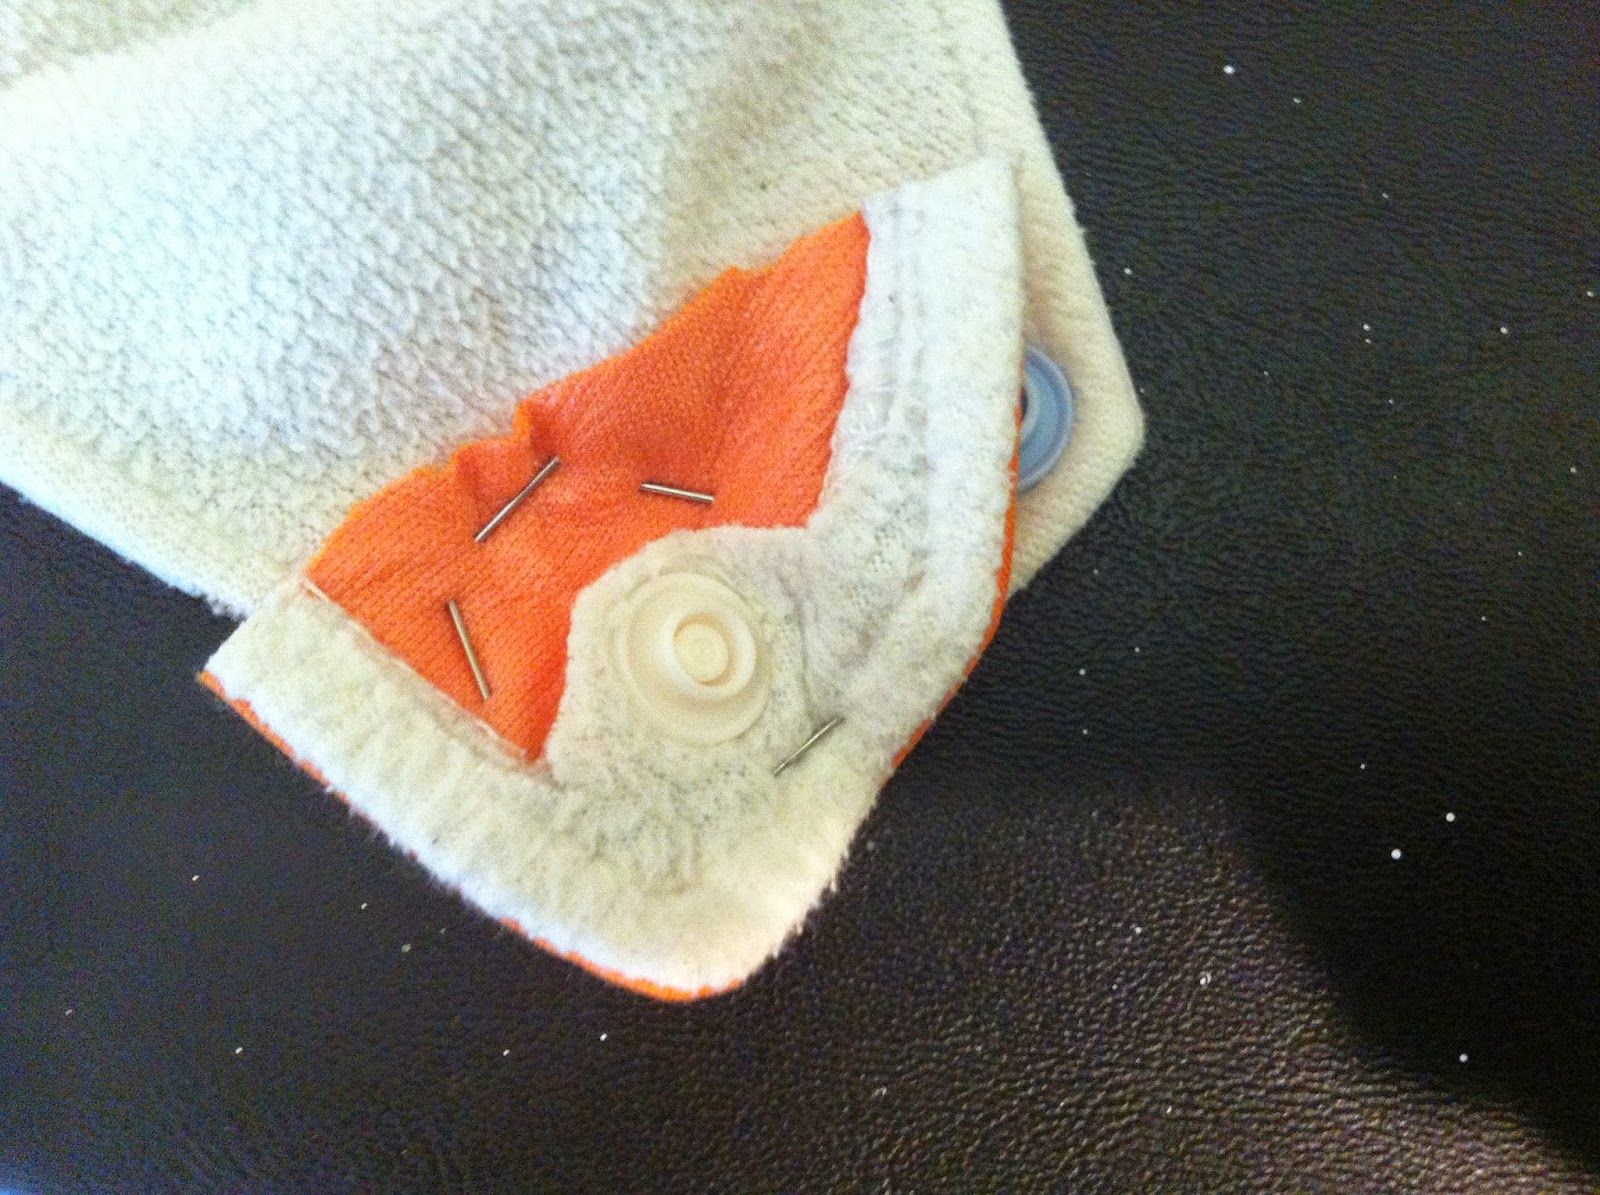
Next, I pinned the good snap to the underside of the diaper that needed the snap.

Replace Cloth Diaper Snaps without Snap Pliers
I pinned in a circle to make it easier for my sewing machine.

Replace Cloth Diaper Snaps without Snap Pliers

Alas, all attempts at sewing on the machine failed. The other snap was too close to the sewing area. And I needed to sew very close to this snap. The sewing foot just didn't have enough room. So I hand stitched around the snap.

I went around twice for good measure. If this snap is going to be pulled on daily, it needs to stay in place.

Replace Cloth Diaper Snaps without Snap Pliers

To finish my snap replacement, I cut away the extra fabric from my replacement snap.

Now to make it look like I didn't repair anything!

I wanted to use the broken snap on the front of the diaper so all the snaps would still match.

Unfortunately, the underside of the snap head still had a pin sticking out of it that made the head not sit flat on the diaper. I used wire cutters to snip off as much as I could.

Replace Cloth Diaper Snaps without Snap Pliers
But the wire cutters didn't snip off enough. So I used a nail file to get the pin really flattened down.


Next, I used Super Glue to attach the snap head to the diaper. I filled the snap with all the glue I thought it would hold, and then carefully, making sure to keep the kangaroo in the appropriate position, placed the snap onto the diaper, trying to center it in my newly sewn circle.

Et voila! Looks pretty good. The brown kangaroo there likes it, I think. He looks excited. If you look closely, you'll notice the stitch line around the snap.

Replace Cloth Diaper Snaps without Snap Pliers

You can tell from the top view that the replaced snap is a little higher off the diaper than the others, which makes sense because there are actually two snap heads, but I think the repair turned out great. I'm so glad to be able to use this diaper again. I like the Rumparooz brand because of the inner gussets, and this kangaroo one is so happy!

Make it Better

Have you repaired a cloth diaper by salvaging a snap from an old or delaminated diaper? How did you do it? How did the repair turn out? How would you improve this repair?

Saturday, July 5, 2014

DIY Thundershirt for Dogs

The 4th of July was this weekend. Last year, the mutts did great! This year, one of them was like The Oatmeal's 4th of July Dog Cartoon.

We visited some friends in the evening, and their dog had a Thundershirt. They said it worked for her. When we got home, we needed to think of something to calm our poor mutt. So we rummaged through Maple Munchkin's too-small-clothes bin and came up with a shirt!

DIY Thundershirt for Dogs - Help Calm Dogs when there's Thunder or Fireworks
Amazingly, it worked. She was much calmer after we put the shirt on her. And I think she looks pretty good in stripes.

Make it Better

How do you calm your mutt when there's thunder or fireworks?

Friday, March 14, 2014

DIY Compost Bin

For Christmas one year, I wanted to make a compost bin for my aunt. She's a gardener, and she loved the present.

My husband helped me. And this was a super-easy project. I used
  • a rain barrel,
  • found wood,
  • scrounged up nails,
  • a drill, 
  • purchased discounted unwanted paint,
  • and purchased hardware: screw loops (4), long pins (2), handle (1), hinges (2).
I drilled very few holes in this one. My first attempt (in my yard) has too many holes and the compost dries out. It's not very effective. So, she can always drill more holes if they're needed, but you can't make holes go away.

To mix the compost, you just roll the bin on the frame piece.

Another cheap DIY project that worked out great!

Make it Better

What have you used to make compost bins? How did they work out?


Thursday, February 20, 2014

Clothespin Bucket and Hook

When my husband hung my retractable clotheslines for me, I was thrilled! So thrilled, that I couldn't wait to hang things on the lines. I got all my sheets ready to hang, and then realized I didn't have any clothespins...

Wednesday, February 19, 2014

Crunchy Pregnancy Resources


In a restaurant called Ciccio's last Sunday, my husband and I decided that "crunchy" is in fact a recognizable culture. It would seem we are leaning more and more in that direction, not so much in a fashion sense, but in an ideological sense.

Thursday, November 21, 2013

Self Watering Container

With old 5 gallon buckets, a wire mesh paint roller grid thing, used soda cans, a plastic container, some PVC pipe, and a drill, you can make a self watering container. Cost: just the pvc pipe.

Nautical Wedding Backdrop

While this was my idea, it was actually put together by my sister in law.

Carrick Bend Knot Projects

When I found the instructions for the headband at You Seriously Made That!?, I got really inspired. Here are some of the projects I've made using this little gem.

Rope Name Plaque

I love nautical themes, so this rope project was really fun. Even more so considering the price!